Developers API
Developers API
Stephanie is inherently a framework using different components to engineer the working of the application. It is built with the thought of providing all the developers a way to build their own modules with minimalistic configuration and convention. By following certain rules and convention anyone can write his own modules to extend the functionality of stephanie and make it a little more personally trained for your own use.
For Non Programmers
For all the non-programmers who have an interest of programming, I am working on a new section which could help people to learn programming interactively while extending the functionality of Stephanie.
With a little knowledge of python (programming language), anyone can write his own modules with simplistic API that stephanie provides.
Getting Started
In this section, we’ll give a quick overview on how should a person go about writing his own modules with a toy example, after that we will explore the entire API, to understand how to build more advanced modules, which could act as a completely new application and at the end a few tips will be provided to make sure your understanding matches with the practical implications.
Directory Structure
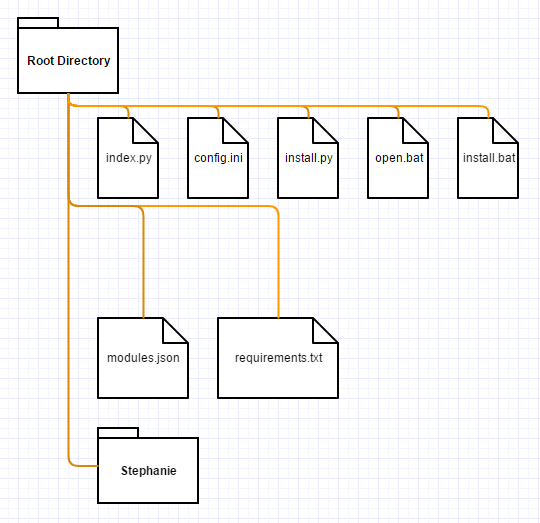
Root Directory Structure.
-
index.py - The main file which boots up the stephanie.
-
config.ini - Responsible for all the configurations required to run stephanie.
-
install.py - The file to install all of the dependencies effectively.
-
open.bat - wrapper to call index.py
-
install.bat - wrapper to call install.py
-
requirements.txt - All the python packages (dependencies) required to run stephanie.
-
modules.json - Configuration of modules such as class_name, handle_method and keywords associated to a given module.
-
Stephanie - The actual package which controls everything.
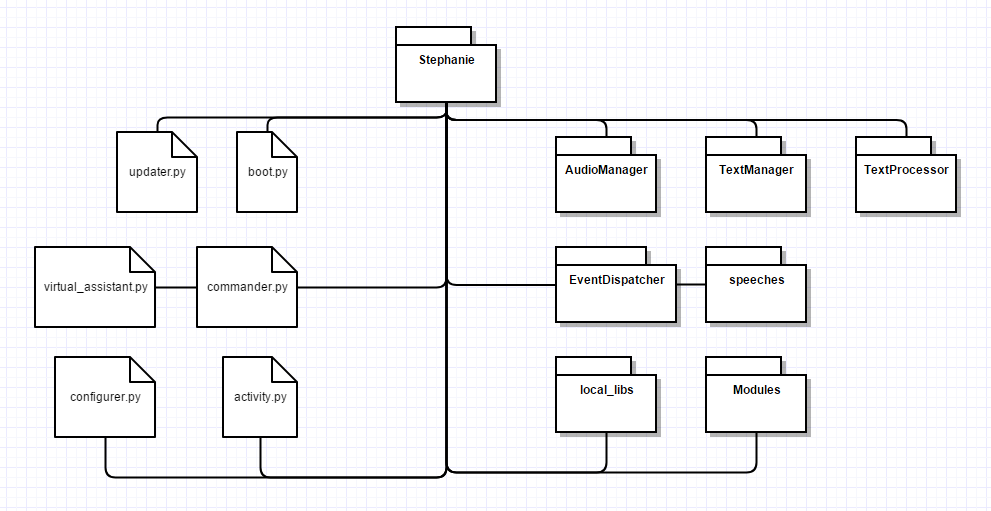
Stephanie Directory Structure.
Packages
-
AudioManager - Responsible for audio department.
-
TextManager - Responsible for audio conversion to text.
-
TextProcessor - Brain of the application, responsible for decision making.
-
EventDispatcher - A simple event dispatcher to handle events.
-
speeches - Container for audio files which get outputted.
-
local_libs - Libraries, or as I call them core classes for modules that get implemented, hence providing an additional abstraction by separating core logic with business one.
-
modules - Actual modules with given class name and methods as defined in config.ini file.
Standalone Scripts
-
boot.py - Responsible for booting up the stephanie.
-
virtual_assistant.py - Another interface to extend abstraction layer.
-
commander.py - Parent class that virtual_assistant.py inherits.
-
activity.py - Responsible for wake_up_engine mechanism.
-
configurer.py - Responsible to handle config.ini file.
-
updater.py - Responsible for checking updates and any potential announcements from Stephanie.
Modules
This is the place where you’ll spent most of your time in, by extending functionality of existing modules of stephanie or adding absolutely new ones. So let me give you an example by writing a simple module and navigate through the steps you need to perform in order to make it working.
Convention.
Stephanie follows PEP8 conventions whenever possible, and is completed Object Oriented, let me show you how to go about it.
- Each module will have a file name in
snake_casesuchfacebook_module,alpha_search_moduleand so on.
Go on and create a file called test_module.py in the modules directory of stephanie.
- Each module will have a class name in
CamelCase(where first character of the word is capital too.) such asFacebookModule,AlphaSearchModuleand so on.
Create a class called TestModule in that file like so : (in test_module.py)
class TestModule:
-
Now this class will inherit from another class called
BaseModulewhich handles all the dependencies that you would need to create a fully functional module.from Stephanie.Modules.base_module import BaseModule class TestModule(BaseModule): -
Each module will have a constructor which will accept undefined amount of positional arguments and pass it to the parents constructor like so.
def __init__(self, *args): super().__init__(*args) -
And that’s it like really, your module is ready to work, now all you need is to define functions and map them in
config.inifile and stephanie will trigger that module accordingly. Let’s define a method calledask_favorite_food. (methods are alsosnake_case)def ask_favorite_food(self): self.assistant.say("What is your favorite food?") user_command = self.assistant.listen().decipher() response = "Oh really? My favorite food is . user_command . "too ." self.assistant.say(response)
The entire class looks like :
  from Stephanie.Modules.base_module import BaseModule


  class TestModule(BaseModule):
          def __init__(self, *args):
              super().__init__(*args)
          def ask_favorite_food(self):
              self.assistant.say("What is your favorite food?")
              user_command = self.assistant.listen().decipher()
              response = "Oh really? My favorite food is . user_command . "too ."
              self.assistant.say(response)
-
And Done. As you can see there is
self.assistantobject which is actually an abstraction layer forAudioManager,TextManagerandTextProcessorenabling you to do stuffs like saying that will actually deliver that as voice from speaker whilelistento the user anddecipherthem to get the actual command that user is requesting and even do routing meaning doing a nested module which we will discuss later in the advanced section. -
Now we just need to wire the module with
modules.jsonto let stephanie know of a new module that has been added and assign certain keywords to it, which will make it trigger. (inmodules.jsonfile at the very end.) :[ . . [..], [..], ["FacebookModule@GetNotifications",["facebook", "notifications"]], ["ZomatoModule@handle",["feeling", "hungry"]], ["TestModule@AskFavoriteFood",["ask", "favorite", "food"]] // As you can see class and method name both are written in CamelCase. ]So basically it’s : (Make sure your modules.json is completely legit, no extra commas or anything.)
["ClassName@FunctionName", ["keywords", "trigger", "module"]] -
One more thing, there are certain keywords which are reserved as
stop words, and are removed from the speech inputted by the user, so any of those keywords mentioned in the above list will not be considered so avoid them in order to make sure that efficiency of the algorithm stays good, here’s the entire list of those reserved stop words:{ "what", "where", "which", "how", "when", "who", "is", "are", "makes", "made", "make", "did", "do", "to", "the", "of", "from", "against", "and", "or", "you", "me", "we", "us", "your", "my", "mine", 'yours', "could", "would", "may", "might", "let", "possibly", 'tell', "give", "told", "gave", "know", "knew", 'a', 'am', 'an', 'i', 'like', 'has', 'have', 'need', 'will', 'be', "this", 'that', "for" } -
And HalleLuyah! (I’m pretty sure I spelled that wrong, but oh well), You can use your new module! Boot up stephanie, (Hey Stephanie wake up, (if it has wake_up on)) and ask something like,
"Hey Stephanie, ask me my favorite food."
API Documentation
The resources you are provided with through dependencies handled by the parent class, “Base Module” and their functionality.
Basic Resources
Some basic textual resources to get you information about why you’re module was triggered. these are basic properties of the parent class, and are accessed with
self.{property_name}
-
raw_text- (string) - raw text unfiltered received from one of the STT services you configured. -
sub_words- (List) The words which were filtered. (articles, tenses and so on.) -
key_words- (List) The keywords that were found in the users command. -
key_words_assigned- (List) The keywords that were assigned to the module in modules.json file. -
AFFIRMATIVE- (List) Words referring to positive command, AFFIRMATIVE = ["YES", "YEAH", "SURE", "YAH", "YA"] -
NEGATIVE- (List) Words referring to negative commands, NEGATIVE = ["NO", "NEGATIVE", "NAH", "NA", "NOPE"]
assistant object
Assistant object is a wrapper around AudioManager, TextManager and TextProcessor which has various methods interconnected to create a Fluent API.
say(text) - (parameter: string, returns: void) Whatever string is given to the method, gets outputted in the audio format.
listen() - (parameter: void, returns: self) Records the audio in memory and returns itself. (the very own instance, “self”)
decipher() - (parameter: void, returns: string) Sends the audio stored in memory to STT API and returns back translated text.
set_modules(modules) (parameter: 2D list, returns: self) Used for nested modules and created advanced applications.
learn(raw_text, explicit=False) - (parameter: string, boolean(optional)) Again used to trigger correct sub module for complex applications.
understand(modules, raw_text, explicit=False) - (parameter: 2D list, string, boolean(optional)) Wrapper around set_modules and learn methods.
events property
Assistant has property called events which handles events happening all around the application, wake_up_engine, quitting application are one of the few applications of it.
I’m not too sure to cover it up in this version of stephanie, since a little more thinking needs to go in there to make it’s usage simpler. But you can take a look at the code, as you’ll see it’s nothing too complicated, but a bit complex.
Coming Soon. (And there are some other bunch of methods and properties present in assistant which you wouldn’t need to worry about as they are available to you though the wrappers provided above, but if you are feeling a bit adventurous that sure enough you can use them straight out of box or create your own implementation.)
config object
Config object is a wrapper around Configurer class of configurer.py which is responsible for handling configurations obtained from config.ini file.
You don’t really need to use it in raw format, since a method is available in parent class called get_configurations which is a handy implementation to get any kind of
configuration.
get_configuration(key, section=”MODULES”)
Parameters: string, string(optional)
Returns string
If you look at config.ini file, it has sections and subsections like so.
    [USER]
    name = Ujjwal Gupta
    age = 18
    ...

    [MODULES]
    wolframalpha_search_engine_key = 9QG2XW-UKHSD7AYDAIH
    ...
So here, sections are USER, MODULES and so on, while keys are name, age, wolframalpha_search_engine_key and so on.
    API_TOKEN = self.get_configuration('wolframalpha_search_engine_key') // gets the key from modules section.
    name = self.get_configuration('name', section="USER") // gets name of the owner.
Advanced Usage
Stephanie can be used to build a lot more complex applications by nesting modules, enabling scope of the stephanie’s decision to lower form and hence improving it’s efficiency and even separating different domains from one another, one clear example of it is found in FootballModule because of it’s large complexity.
So as always you can take a look at the code written for football_module which involves local_libs to organize code neatly and separate core logic with business one, But let
me show you another example, to get you a better and clearer understanding.
Just like in Getting Started section, we will first define a module, let’s call it chat_module.py and prepare the class like last time as follows:
                    from Stephanie.Modules.base_module import BaseModule


                    class ChatModule(BaseModule):
                            def __init__(self, *args):
                                    super().__init__(*args)

                            def handle(self):
                                // write business logic.
-
Now let’s just say, we’ll a create a mini chatter module, that talks to us, and stuffs, (Though stephanie isn’t the best application to create chat modules because it doesn’t gets better with the results, it’s not a Machine Learning or AI application, it’s main purpose is to automate some of your tasts, just what a assistant does.), so now let’s write some business logic.
from Stephanie.Modules.base_module import BaseModule class ChatModule(BaseModule): def __init__(self, *args): super().__init__(*args) name = self.get_configuration('name', section='USER') def handle(self): self.assistant.say("Hey %s, How was your day?" % (self.name)) user_command = self.assistant.listen().decipher() -
Don’t forget to wire the new module in
modules.jsonfile like so:[ [..] [..] [ ChatModule@handle, ["feeling", "alone"] ] ] -
Now we’ll set up modules, within our
ChatModuleto do nesting, and let stephanie think which sub module we’re referring using the given algorithm described earlier, Notice the format in which modules are defined.from Stephanie.Modules.base_module import BaseModule class ChatModule(BaseModule): modules = [ "ChatModule@BadDay", ["bad", "day], "ChatModule@GoodDay", ["good", "day"], "ChatModule@FineDay", ["fine", "day"] ] def __init__(self, *args): super().__init__(*args) name = self.get_configuration('name', section='USER') def handle(self): self.assistant.say("Hey %s, How was your day?" % (self.name)) user_command = self.assistant.listen().decipher() module_function_that_is_guess = self.assistant.understand(self.modules, text) // returns string bad_day, good_day or fine_day func = gettattr(self, module_function_that_is_guess) // gets the actual function func() // invokes it. def good_day(self): self.assistant.say("Oh wow that was awesome! . self.name) def bad_day(self): self.assistant.say("Don't worry , . self.name . " tomorrow will be better!"). def fine_day(self): self.assistant.say("Oh okay, let's make it better.") -
As you can see, you can go ahead and do even further chaining, reducing the scope of the stephanie’s decision making system and creating some of the most powerful and complex modules like football module which deals with more than 100 teams and 5 leagues.
-
Stephanie’s
assistantobject functionunderstandis a wrapper aroundset_modules,learnandget_methodname to make job easier, otherwise you can use them straight out of the box like so.module_which_i_guessed = self.assistant.set_modules(modules).learn(user_command) module_which_i_guessed // is a dict with keys keywords, subwords and module_info (which is ChatModule@GoodDay) module_which_i_guessed['module_info'] // is a string like so ChatModule@GoodDay, now just instantiate the class dynamically and call the function.
Practical Tips
-
In case your module seems to be quite complex to be controlled by a
standalonescript, instead of writing business logic, just write your package in thelocal libs, pass theassistantobject and anything you need to it, and control stephahie from your own package present inlocal_libsdirectory. -
Don’t be afraid to see all the modules written since you can learn much more just by seeing that code, instead of going through theoretical documentation. And to be completely honest, some of the modules like
system_module,facebook_module,wikipedia_module, etc are one of the most simplest of the python scripts. -
The use of
AFFIRMATIVEandNEGATIVEvariables can be used as follows:
if user_command in self.NEGATIVE:
return "Thank you"
-
And just keep trying new things, just program modules, it’s only after few mistakes you’ll get what’s really happening and get hold of the entire convention and logic thing.
-
You can import packages written by other people like requests library and so on, simply by importing it at the top and using it, I mean you don’t need to do any fancy stuffs everything will work just fine.
-
While using Stephanie, the order at which keywords appear doesn’t matter, so
"what is the weather forecast for tomorrow?"and"Give me forecast of weather for tomorrow.", would mean the same thing, though you might wanna use correct keywords, and hence try to make your commands clear and concise to get the best efficiency. -
Any string that is returned from
handlemethod (or whatever method you defined inmodules.json) is spoken by stephanie too, so instead ofself.assistant.say("thank you"), you could do a simplereturn "Thank you.", as both will work identically.
Easy Integration
Stephanie provides a really easy integration of 3rd party modules, and if you have created your very own module and would like to share with the other community, then please do. like really Stephanie is nothing without the community’s support.
And it’s the modules built by developers like you which could let Stephanie grow as a community, the guidelines are pretty simple.
- Create a github repository with the actual module.
- Write a setup on how to integrate it, basically copy pasting it to modules folder, installing some package as a dependency? wiring the module name in modules.json
- Sharing it with Stephanie’s main team by using any of the social media links listed below especially Reddit so that we can show it to other users in one single place in the resources section.